Free Windows utilities for benchtop instruments and matching Arduino sketches. Built in-house to make repair work, calibration and data logging faster. Streamer mode (v1.0.1+) drives the window background transparent so you can composite live readings in OBS without a chroma key.
AAC Apps for Windows
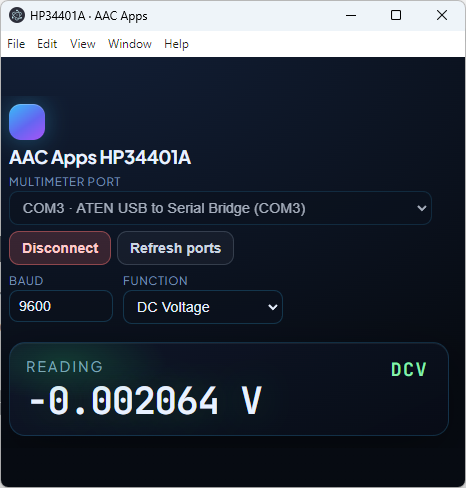
Digital Multimeter
One app for multiple bench DMMs — similar to OwonDMM, with added support for Owon XDM series, HP/Agilent 34401A, and Siglent SDM3045X. Pick your instrument, configure the connection, and log live readings from your PC. Siglent SDM3045X requires NI-VISA to be installed on your PC.
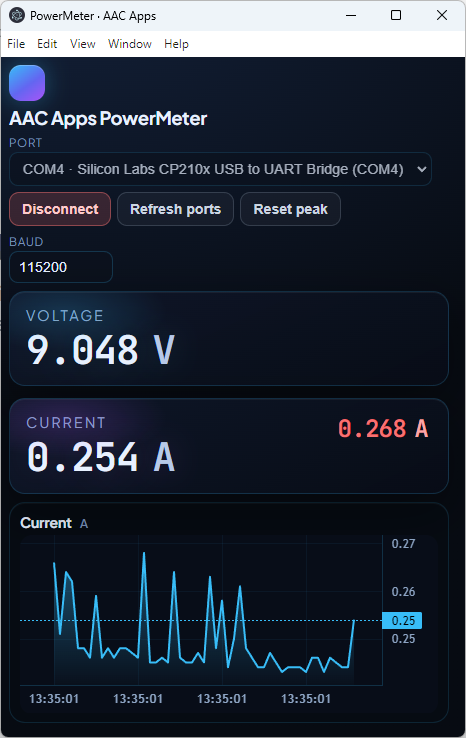
Lab Meter
Extends the LabMeter workflow beyond Arduino + INA260: monitor voltage and current from an Owon P4305, Aixun P3208, or Keysight E36100 series bench supply, with the same live chart and peak-hold tools you already know from AAC Apps LabMeter.
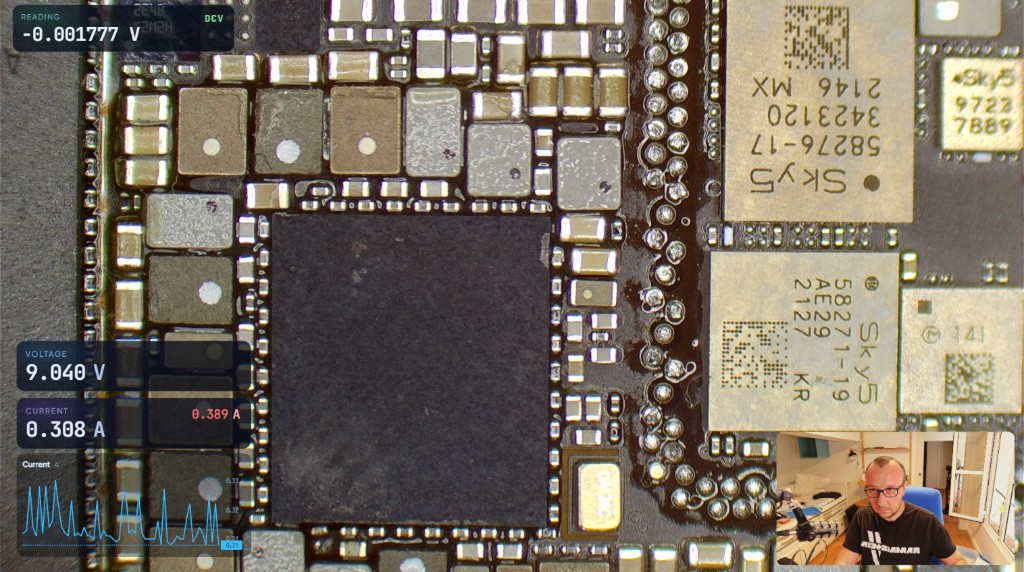
Streamer mode in OBS
Every AAC App can switch to streamer mode: the main window background becomes fully transparent so your reading cards float over the scene. In OBS you can capture the window directly—no green screen and no chroma key filter required.
Below is a real OBS capture: multimeter and LabMeter overlays on top of a microscope camera feed, with a small webcam inset.
Companion sketches for AAC LabMeter
Flash one of these sketches onto any Arduino (Uno, Nano, ESP32, etc.) and
connect an INA219, INA260, or INA226 over I²C. The sketch prints
Voltage:
and
Current:
lines over USB serial — exactly what the
AAC Apps LabMeter Windows app expects.
#include <Wire.h>
#include <Adafruit_INA219.h>

// Create the INA219 object
Adafruit_INA219 ina219;

void setup() {
  // Set the serial speed
  Serial.begin(115200);

  // Wait for the serial port to connect
  while (!Serial) {
      delay(1);
  }

  // Initialize the INA219
  if (!ina219.begin()) {
    Serial.println("Failed to find INA219 chip. Check your wiring!");
    while (1) { delay(10); }
  }
}

void loop() {
  float busVoltage_V = 0;
  float current_mA = 0;
  float current_A = 0;

  // Read the bus voltage (voltage between GND and V-)
  busVoltage_V = ina219.getBusVoltage_V();

  // Read the current in milliamps
  current_mA = ina219.getCurrent_mA();

  // Convert current from milliamps (mA) to amps (A) to match your format
  current_A = abs(current_mA / 1000.0);

  // Output to serial in the exact format requested
  // The ", 3" tells the print function to enforce 3 decimal places
  Serial.print("Voltage:");
  Serial.println(busVoltage_V, 3);

  Serial.print("Current:");
  Serial.println(current_A, 3);

  delay(100);
}
Wiring
SDA → A4 · SCL → A5 (Uno/Nano). V+ / V- in series with the load.Range
Up to26 V bus, ±3.2 A with shunt 0.1 Ω. Best for sub-amp loads.
Library
InstallAdafruit INA219 from Arduino Library Manager before compiling.
#include <Wire.h>
#include <Adafruit_INA260.h>

// Create the INA260 object
Adafruit_INA260 ina260 = Adafruit_INA260();

void setup() {
  // Set the serial speed
  Serial.begin(115200);

  // Wait for the serial port to connect
  while (!Serial) {
      delay(1);
  }

  // Initialize the INA260
  if (!ina260.begin()) {
    Serial.println("Failed to find INA260 chip. Check your wiring!");
    while (1) { delay(10); }
  }
}

void loop() {
  float busVoltage_V = 0;
  float current_mA = 0;
  float current_A = 0;

  // The INA260 reads voltage in MILLIVOLTS (mV).
  // We divide by 1000 to convert it to Volts (V) to match your format.
  busVoltage_V = ina260.readBusVoltage() / 1000.0;

  // The INA260 reads current in milliamps (mA).
  current_mA = ina260.readCurrent();

  // Force the current to always be positive, then convert to Amps (A)
  current_A = abs(current_mA) / 1000.0;

  // Output to serial in the exact format requested with 3 decimal places
  Serial.print("Voltage:");
  Serial.println(busVoltage_V, 3);

  Serial.print("Current:");
  Serial.println(current_A, 3);

  delay(100);
}
Wiring
SDA → A4 · SCL → A5 (Uno/Nano). Built-in shunt — wire in series with the load.Range
Up to36 V bus, ±15 A peak with the integrated 2 mΩ shunt.
Library
InstallAdafruit INA260 from Arduino Library Manager before compiling.
#include <Wire.h>
#include <INA226_WE.h>

// The default I2C address for most INA226 modules is 0x40
#define I2C_ADDRESS 0x40

// Create the INA226 object - you need to install library INA226_WE by Wolfgang Ewald
INA226_WE ina226 = INA226_WE(I2C_ADDRESS);

void setup() {
  // Set the serial speed
  Serial.begin(115200);

  // Wait for the serial port to connect
  while (!Serial) {
      delay(1);
  }

  // Initialize the I2C bus
  Wire.begin();

  // Initialize the INA226
  if (!ina226.init()) {
    Serial.println("Failed to find INA226 chip. Check your wiring!");
    while (1) { delay(10); }
  }

  // Note: The INA226_WE library defaults to a 0.1 Ohm shunt resistor and a 3.6A range.
  // This matches 99% of the generic INA226 breakout boards on the market.
}

void loop() {
  float busVoltage_V = 0;
  float current_mA = 0;
  float current_A = 0;

  // Read the bus voltage in Volts (V)
  busVoltage_V = ina226.getBusVoltage_V();

  // Read the current in milliamps (mA)
  current_mA = ina226.getCurrent_mA();

  // Force the current to always be positive, then convert to Amps (A)
  current_A = abs(current_mA) / 1000.0;

  // Output to serial in the exact format requested with 3 decimal places
  Serial.print("Voltage:");
  Serial.println(busVoltage_V, 3);

  Serial.print("Current:");
  Serial.println(current_A, 3);

  delay(100);
}
Wiring
SDA → A4 · SCL → A5 (Uno/Nano). V+ / V- in series with the load. Default I²C address0x40.
Range
Up to36 V bus; sketch uses library defaults (0.1 Ω shunt, about ±3.6 A) for typical breakouts.
Library
InstallINA226_WE (Wolfgang Ewald) from Arduino Library Manager before compiling.
How to use
Three quick steps from instrument to live readings on your laptop. Both the multimeter loggers and LabMeter follow the same flow.
Install
Download and run the matching .exe installer.
Connect
Plug the instrument over USB / RS-232 and pick the COM port.
Read
Hit Connect and watch live values stream in.
